Easy Install Pack contain:
Original Basarsoft: data, ux files, save (save file contain original basarsoft save files)
Apk: basarsoft_nextgen_v9.18.27.627562_gx.apk that djeman have been posted
Easy Pack is full and Ready
Get Easy Install Pack
Pass:gpspower.net
Installation Using Preload files in Save file form Original Basarsoft
1.If you have folder "iGO" in Internal or in SD Card you must Rename it to: 22iGO or whatever name!
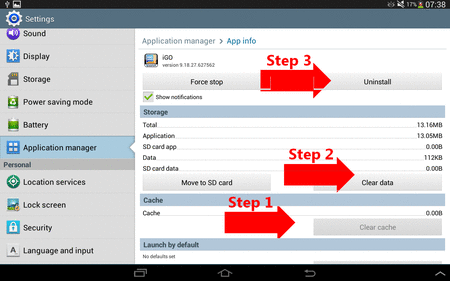
2.If you have iGO Primo install in your device, then you must Unistall it, clear data,clear cache,Unistall apk!
3.If you already have folder iGo_Basar in your device delete it.
4.If you already have install in your device Basarsoft Nextgen Apk then Unistall(Clear) with 3 steps show:

5.From Download file copy folder "iGO_Basar" as it is to your Internal Memory (Not to SDCARD !!!) DO NOT DELETE FOLDER "save" this folder make the Job
6.Don't needed to add anything at the moment because apk,license,basemap,1 voice Included.
7.Go to : iGO_Basar\Install\basarsoft_nextgen_v9.18.27.627562_gx.apk and Install this apk.
8.Run Application Basarsoft.
9.After 1st Run, you will see that sys.txt has been created by this .apk.
10.Take this sys.txt, you can add your mods like and Run Apk with your preferances.
11.Add dem,map,poi,building you like
12.After 1st Run you can Delete folder save and run it again.But it will be better to keep original settings in iGO_Basar and just to change language and voices from menu settings ....
13.After 1st Run, screen Resolution may not be compatible to yours device, so you can add in sys.txt:
[rawdisplay]
dpi=240 ;;;change this value to be compatible to your device (make screen smaller or bigger)
Notes:
1.This apk have been created by gx, posted here by djeman.
2.This apk has big advantage, because TTS works both in 2 way:
A.You can use Vocalizer TTS
B.You can use TTS Engine inside folder iGO_Basar\tts_nua_v1 , so no more Drunk TTS!!
3.Don't add in your sys.txt anything about sound in section [sound] from your old sys.txt.....
If you add in your sys.txt section about sound that confuse this apk, TTS will be mute!!!
If you need Simple voice take a look here:
http://www.gpspower.net/igo-nextgen-...e-android.html
If you need TTS Vocalizer take a look here:
http://www.gpspower.net/igo-nextgen-...n-android.html
If you need Nuance(ve) just for this Basarsoft apk take a look here:
http://www.gpspower.net/igo-nextgen-...2-android.html
None apk has worked to me except djeman, and only this Installation works to me,
Hope this post help users with KitKat or other Android version who has problem with Black screen or not responding Basarsoft .apk
Credit:
gx,djeman
How to fix Space Problem?
If you have space problem in Internal memory of your device do the following:
Create in SD card folder "addons" and inside this folder create one more folder: content
Inside content folder add foder map, folder poi, folder building.
Like this:
SDCARD:addons\content\building\copy here building you like
SDCARD:addons\content\dem\copy here dem you like
SDCARD:addons\content\map\copy here maps you like
SDCARD:addons\content\poi\copy here poi you like
To work you must add, "at the top" in your sys.txt the following:
[folders]
has_secondary_root=1
android_secondary_root_path="/storage/extSdCard/addons"
addons="/storage/extSdCard/addons"
Important
With Astro file manager, or a simple file manager you must check which name has SDcard in your device!
In case your card has name "extStorages" for example, then you must add this at the top of your sys.txt:
[folders]
has_secondary_root=1
android_secondary_root_path="/storage/extStorages/addons"
addons="/storage/extStorages/addons"
How to see more sky?
If you like to see more sky you can try to add in your sys.txt the following:
[map]
3d_default_tiltlevel=16000
3d_max_tiltlevel=18000
3d_max_zoomlevel=3000
3d_min_zoomlevel=30
3d_scale_carmodel=1
3dcarsizemin=9000
3dcarsizemax=15000
3dcarsizemul=80000
raster_in_2d=0
raster_in_3d=0
raster_2d_high_quality=1
raster_3d_high_quality=1
speedcam_visibility=800
poi_3d_speedcam_icon_overlap=1
[3d]
planned_route_contour_width=3
use_all_building_textures=0
fade_distance_for_car=0
fade_distance_for_guidance_arrow=0
fade_overlap_tolerance=0
fade_around_cursor=0
max_pois_on_horizont=5
max_poi_mapping=5
poi_mapping=5
multi_poi_distant_distance=0
multi_poi_icon_distant_distance=0
usepolyfarroads=0
double_pixel_similarity_check=0
max_loading_time_immediate=200
Settings for smartzoom option in Basar Navigation?
If you don't like default smartzoom by NextGen, then you can change in menu view "Close" and try to add in your sys.txt the following:
;;;Settings for SmartZoom in NaviCar International
[camera.intersection_zoom]
enabled=0
[camera.roundabout]
enabled=0
[camera1]
maxdistance=800
minzoom2d=60
maxzoom2d=240
defaultzoom2d=120
overview_zoom2d=3600
minzoom=25
maxzoom=50
minangle=70
maxangle=88
defaultzoom3d=65
defaultangle=88
angleoffset=65
speedzoom=1
speedangle=1
overview_enabled=0
overview_distance=800
overview_zoom3d=40
overview_angle=80
[camera11]
maxdistance=800
minzoom2d=90
maxzoom2d=360
defaultzoom2d=240
overview_zoom2d=4500
minzoom=25
maxzoom=60
minangle=70
maxangle=88
defaultzoom3d=65
defaultangle=88
angleoffset=43
speedzoom=1
speedangle=1
overview_enabled=0
overview_distance=800
overview_zoom3d=40
overview_angle=80
[camera2]
maxdistance=800
minzoom2d=90
maxzoom2d=450
defaultzoom2d=168
overview_zoom2d=3600
minzoom=20
maxzoom=45
minangle=70
maxangle=86
defaultzoom3d=65
defaultangle=82
angleoffset=65
speedzoom=1
speedangle=1
overview_enabled=0
overview_distance=800
overview_zoom3d=700
overview_angle=75
[camera21]
maxdistance=800
minzoom2d=108
maxzoom2d=600
defaultzoom2d=420
overview_zoom2d=4500
minzoom=25
maxzoom=45
minangle=70
maxangle=82
defaultzoom3d=70
defaultangle=82
angleoffset=43
speedzoom=1
speedangle=1
overview_enabled=0
overview_distance=800
overview_zoom3d=50
overview_angle=80
[camera3]
maxdistance=2000
minzoom2d=120
maxzoom2d=1500
defaultzoom2d=480
overview_zoom2d=3600
minzoom=40
maxzoom=140
minangle=60
maxangle=80
defaultzoom3d=80
defaultangle=80
angleoffset=65
speedzoom=1
speedangle=1
overview_enabled=1
overview_distance=3000
overview_zoom3d=1500
overview_angle=80
[camera31]
maxdistance=2000
minzoom2d=120
maxzoom2d=1800
defaultzoom2d=720
overview_zoom2d=4500
minzoom=40
maxzoom=140
minangle=60
maxangle=80
defaultzoom3d=90
defaultangle=80
angleoffset=60
speedzoom=1
speedangle=1
overview_enabled=1
overview_distance=3000
overview_zoom3d=1500
overview_angle=72